
This guide sets up My Events, an example event sign-up app built entirely with Bosbec Workflows. It includes a page for creating events, a shareable page for guests, and a REST API behind both.
The example is a complete small application with 85 jobs, six API endpoints, and two web pages. Use it to see how a finished workflow works, then open it in Workflow Builder and adapt it to your own needs. If you want the shortest path to a first API response, start with Quickstart: Your first API.
What the example includes
| Part | Where it lives |
|---|---|
| Admin page: create events, see who signed up | GET /admin |
| Sign-up page: what your guests open | GET /register?id=... |
| REST API: events and registrations | /api/* |
| API reference, rendered from the spec | GET /docs |
| Storage: events and participants as Units | Two groups in your account |
Both pages are served by the workflow itself, from the same HTTP-in channel as the API. There is no separate web host or deployment step.
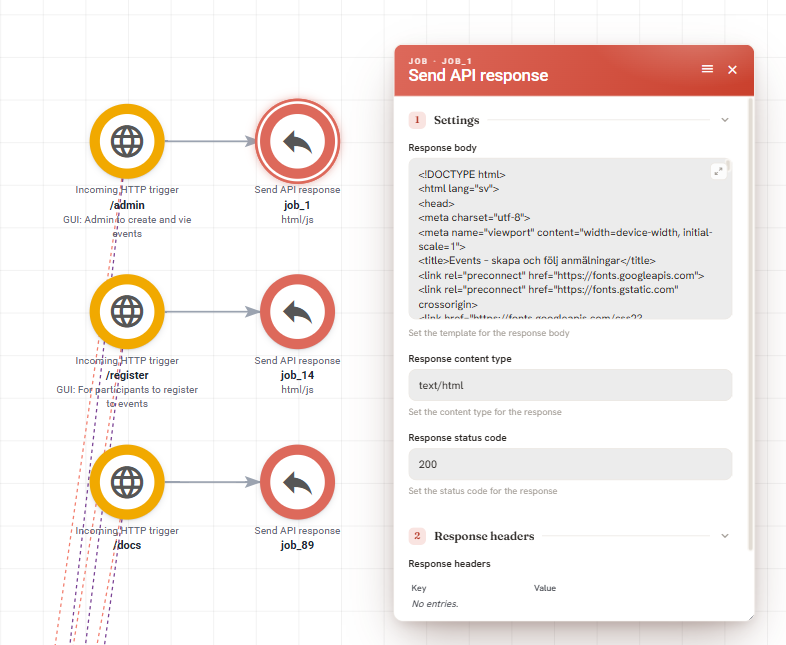
A page is an HTML body returned by a Send API response job, using the same mechanism as a JSON endpoint with a different content type.
Import the workflow
Open Workflow Builder and navigate to View > Workflow Library.
Under Templates, find and import the template named Bosbec: My Events. The template contains the pages, API endpoints, and setup trigger used in this guide.
If you created your account using the button on this page, you may already have selected this template when launching Workflow Builder and can skip this step.
Set up the workflow
The workflow needs an HTTP-in channel to expose its pages and API. Create one on your account, then open each HTTP trigger in the workflow and select the channel you created.
Open the create_groups trigger and find the Data operations job at the start
of it. It contains two Set data operations for the names of the groups that
store your events and participants. Change them if you like, or keep the
defaults.
Use plain names: letters, digits, spaces and hyphens. The lookup that follows treats the name as a regular expression, so brackets and dots can cause a miss.
Save and activate the workflow after configuring the triggers.
Right-click the create_groups trigger and choose Start trigger. It looks
for each group by name, creates it if it does not exist, and stores the two group
IDs in your account settings. Every other job reads the IDs from there, so this
is the only place groups are configured.
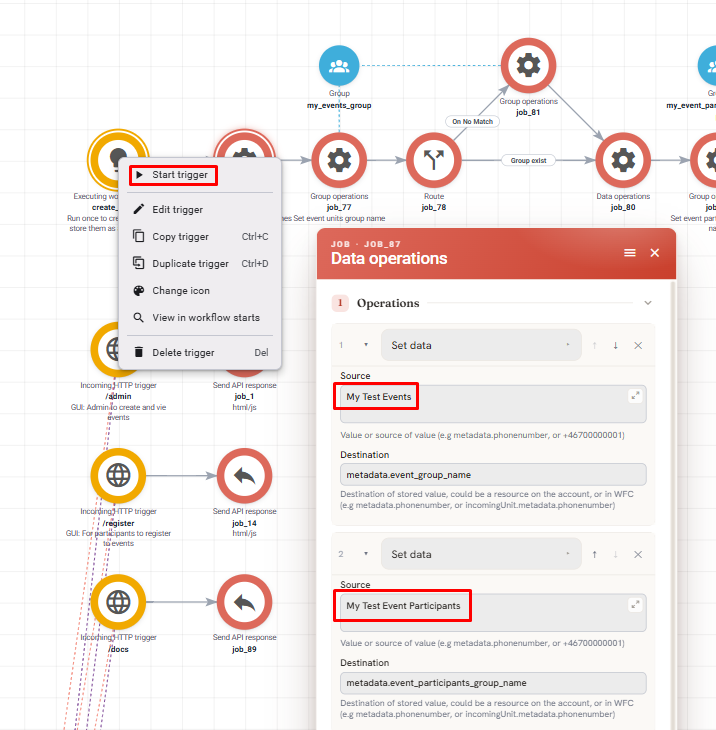
The Data operations job holds the two group names. The right-click menu is where you run the trigger.
Running the trigger twice is harmless because it reuses groups that already exist. Do not change the group names after creating events, or the workflow will start looking in a new, empty group while your data remains in the old one.
Use the application
Open /admin on your channel and create an event. Copy the link it gives you,
open it in another tab, and sign yourself up. Return to the admin page to see
your name in the participant list.
For example, if your channel is https://my-events.in.bosbec.io, open
https://my-events.in.bosbec.io/admin.
How it works
Each endpoint follows the same pattern: read the input, validate it, access the stored data, and send a response. The workflow uses separate response jobs for validation errors so that each API error has a clear status and message.
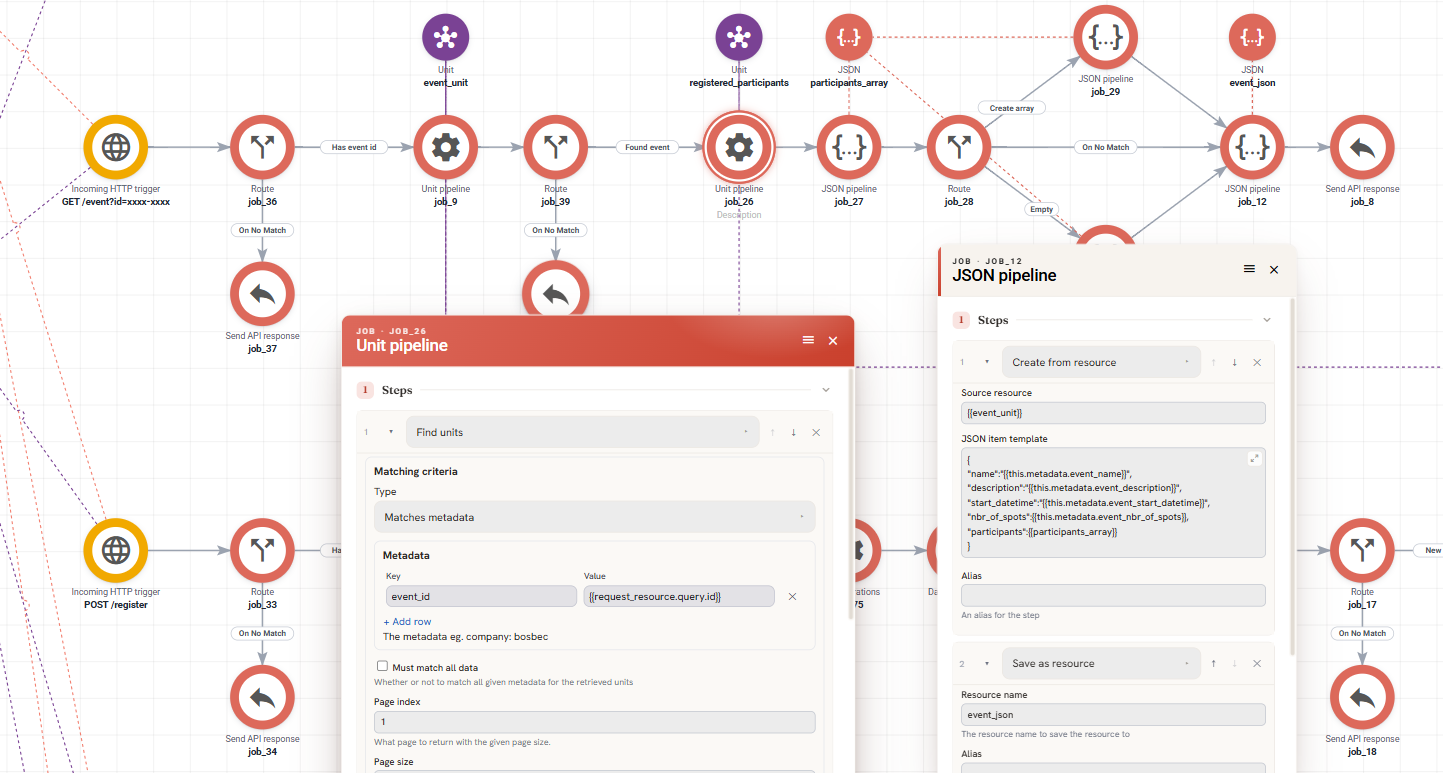
GET /api/event end to end. The Unit pipeline finds the event by event_id,
and the JSON pipeline's item template is where a Unit's fields become the shape
the API returns.
POST /api/register is the most instructive endpoint. Its trigger checks six
things in order, each in its own route, and the first failure wins:
| Check | Failure |
|---|---|
| Event ID in the query string | 400 missing_event_id |
| Event exists | 404 wrong_event_id |
| Email present and valid | 400 missing_or_invalid_email |
| Not already registered | 409 already_registered |
| Name present | 400 missing_name |
| Spots left | 409 event_full |
The routes run in this order from top to bottom. Only after the last check does
the Unit pipeline write the participant Unit, a Data operations job
increment spots_taken, and the final Send API response return 200 success.
The order matters more than it looks. Validate the body before checking capacity, or a guest who forgot to type their name is told the event is full.
Two Unit types
Events and participants are both stored as Units, in the two groups you created.
An event Unit carries event_id, event_name, event_description,
event_start_datetime, event_nbr_of_spots and spots_taken. It also sets
firstname to the event ID and lastname to the event name, which is what
gives the Unit a readable label in lists.
A participant Unit carries email, name and the event_id of the event they
signed up for. That event_id is the only link between the two. There is no
relation type, just a matching value, and every lookup filters on it.
Reading the API
The full contract is in openapi.yaml, served at /api/openapi.yaml and
rendered for reading at /docs. Two conventions worth knowing before you read
it:
Successful reads return data directly. Everything else returns
{ "status": "...", "message": "..." }. Branch on status; it is stable.
message is for humans and may be reworded.
Numbers are numbers. nbr_of_spots and spots_taken are integers, not strings.
The same contract in one file, with request bodies, example responses and every
status value, is available here:
Extend the application
The template is a starting point rather than a production-ready system. Here are some ways to extend it.
Add a field to events
Say you want a location. It touches five places, and three of them are in the
POST /api/create trigger, in the order the jobs run:
- The request: accept
locationin thePOST /api/createbody. - The Parse JSON to resource job: this is where the incoming JSON is read.
- The Unit pipeline: add
metadata.event_locationto the field mapping, following thedefaultvalue(...)pattern the other fields use so a missing value becomes an empty string rather than an error. - The JSON pipeline: include it in the response.
- The pages: update the form in
/adminand the display in/register, each the HTML body of that trigger's Send API response.
Adding a field to participants, such as dietary requirements, follows the same
pattern in the POST /api/register trigger: the Parse JSON to resource, the
Unit pipeline that writes the participant, and the sign-up form.
Add a registration deadline
Store a registration_closes timestamp on the event, then add a route in the
POST /api/register chain that compares it to the current time and returns
409 registration_closed. Put it next to the capacity check. Both checks ask
whether the event can still accept anyone.
Other ideas
- Waiting list: when
event_full, store the participant with awaitingflag instead of refusing them. - Confirmation email: send a message when registration succeeds. You will need the channel's absolute URL for the link, since there is no browser to supply it. Store it in account settings, the way group IDs are stored.
- Editing events: there is no
PUT. Add one. - Authentication: the admin page is open to anyone who knows the URL.
Troubleshooting
Some workflow problems fail silently: the run succeeds, but a wrong value is used later. An expression that cannot resolve renders as its own text, a Set data operation with an empty result leaves the old value in place, and a route with Compare value is regex enabled ignores its compare operator.
For more detail, see When a job succeeded but did the wrong thing, Working with Variables, and Route From Meta Data.