
Overview
BankID is a widely used electronic identification service in Sweden, and many Bosbec customers want to let their end users verify or sign using BankID as part of a call flow, web form, or other customer journey.
Bosbec provides a built-in BankID implementation. If you use Bosbec’s own certificate, the BankID verification screen will show Bosbec as the requesting party. If you need the verification to show your own company’s name and certificate instead, you’ll need to go through a BankID broker/provider, which exposes an API that Bosbec integrates against on your behalf.
If that broker is IDkollen, Integrating BankID via IDkollen is the guide to follow — it walks through the whole flow against IDkollen’s API, and you don’t need this article first.
The three steps
Every BankID integration, regardless of channel, breaks down into the same three steps:
- Initiate the session — collect the personal identity number (pnr) and start a BankID session, either via web (redirect) or phone (an active call).
- Perform the verification — the end user completes the authentication or signing in the BankID app.
- Receive the result — either by listening for a callback, or by polling a status URL.
The sections below walk through how to build each step in Workflow Builder.
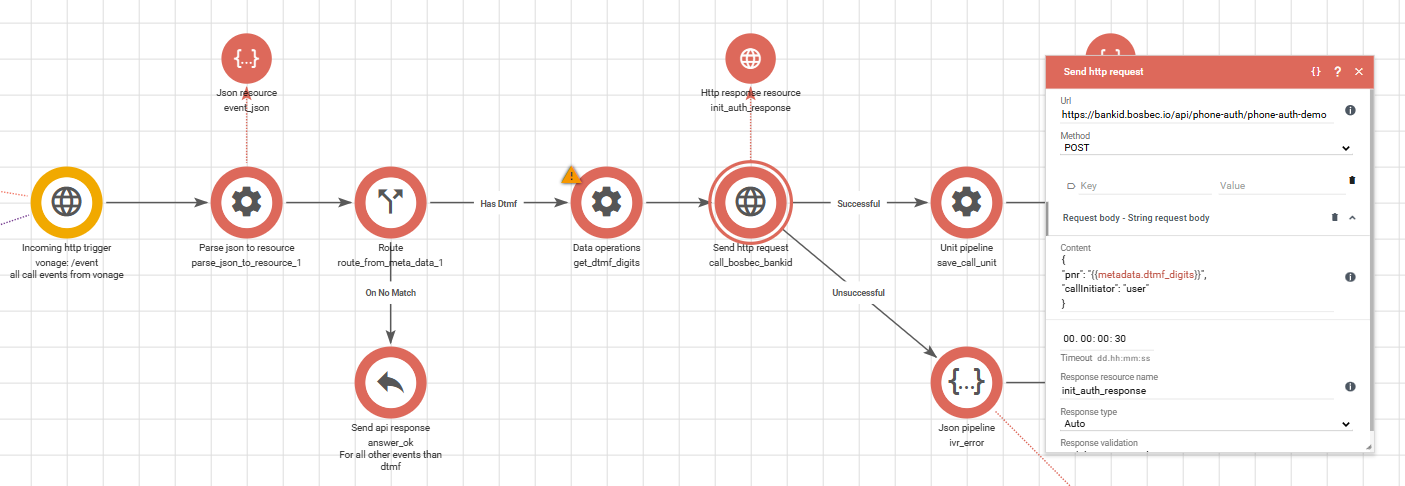
Step 1: Initiate the session
There are two modes for starting a BankID session, depending on the channel:
- Web: the user is redirected to a URL where they complete the whole process themselves (entering their pnr, opening BankID, confirming). Bosbec only needs to kick this off and later receive the result.
- Phone: a session is initiated while the user is on an active call — for example, the personal number is captured via DTMF digits, or looked up from another system if the call center already knows who’s calling.
To build this in Workflow Builder:
- Set up an HTTP channel and create an HTTP trigger on it. This is the entry point for the flow — it fires when the web page or the phone/switchboard solution calls into Bosbec to start a session.
- Use a JSON Pipeline job to assemble the request body for the BankID API call (e.g.
pnrandcallInitiator). - Use a Send HTTP Request job to make the actual API call to BankID (or the broker, such as IDkollen) with that payload.
- Use a Unit Pipeline job to create a unit for the session. This is what lets you track the process end-to-end — you’ll use this same unit later to match the incoming callback back to this specific session.
callInitiatordescribes who initiated the phone call, not who starts the BankID session:"user"if the end user called in,"RP"(Relying Party) if your side called them — see below.
Step 2: Perform the verification
This step happens outside Bosbec — the end user opens the BankID app on their device and approves the authentication or signing request. There’s nothing to build here, but it’s worth understanding what the user sees, since it affects your flow design (see the callInitiator note below).
Step 3: Receive the result
Once the user has approved (or declined, or the session times out), Bosbec needs to find out the result. There are two ways to do this:
| Approach | Pros | Cons |
|---|---|---|
| Callback | Fastest possible result — you’re notified the moment the session completes, with no guessing about wait times | Requires a publicly reachable endpoint to receive the callback |
| Polling | Simpler to build — no public endpoint needed | You must decide how often/how long to poll, and results arrive slightly slower |
If your system can expose a public endpoint, callback is the preferred approach. If not, polling is a perfectly valid and simpler alternative.
To build the callback path in Workflow Builder:
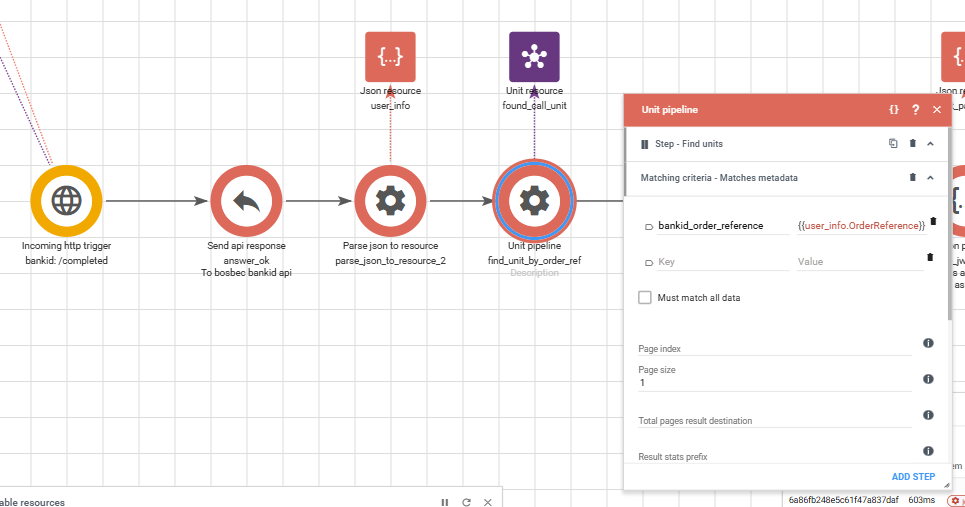
- Set up a second HTTP trigger (on its own path) to receive the incoming callback request from BankID.
- Use a Parse JSON job to extract the relevant fields from the callback payload (e.g.
OrderReference,FirstName,LastName,PersonalNumber). - Use a Unit Pipeline job to look up the unit you created in step 1, using the
OrderReferenceto match it to the right session. - Use a Route job to evaluate the result and branch the flow depending on whether the verification succeeded or failed.
Who enters the personal number: user vs. relying party (RP)
This comes down to who initiated contact, and it plays out slightly differently depending on the channel:
- Web: always
"user"— the end user is on the web page themselves, typing in their own pnr. - Phone: it depends on who called whom:
- If the end user called in and entered their own pnr (e.g. via DTMF),
callInitiatoris"user". - If the customer’s system called the end user (or otherwise reached out to them) without the user entering anything themselves,
callInitiatoris"RP"(Relying Party).
- If the end user called in and entered their own pnr (e.g. via DTMF),
When callInitiator is "RP", the BankID app shows the user a warning message asking them to confirm they consent to being contacted by the provider. The advantage of this mode is that the user doesn’t need to enter anything at all — they simply open the BankID app to approve. This is common, for example, when a healthcare center calls a patient to verify their identity, or when a company reaches out to a customer to sign a contract, and the pnr is instead looked up from another system (such as a patient register) rather than typed in — which also removes the risk of input errors.
Example: using Bosbec’s built-in BankID service
The steps above apply regardless of which BankID service you integrate against. This section walks through two concrete examples using Bosbec’s own built-in BankID implementation (as opposed to going through a broker like IDkollen): one for web, one for phone.
In both cases, Bosbec sets up a unique path per customer, and behind the scenes registers a matching callback URL for that same path. The customer doesn’t choose or control this callback URL — it’s set up in advance as part of onboarding. All the customer needs to do is create an HTTP trigger on their account using that callback path, and they’ll receive the result there once the verification completes.
Prerequisite: setting up a BankID user
Before a customer can start using Bosbec’s built-in BankID service, a BankID user needs to be created for them, and a unique path (and its matching callback URL) needs to be registered. This is not something the customer can do themselves — it’s a manual step that Bosbec support/operations needs to perform first. Make sure this has been done before the customer tries to build or test their workflow.
1. Web flow (user)
The customer’s end users call https://bankid.bosbec.io/<my-unique-path> — this is the web page where the user enters their pnr and completes the verification themselves.
On the customer’s account, they build:
- An HTTP trigger on the pre-registered callback path, which fires once the verification is done and delivers the result.
- From there, the customer can return a response directly, but the most common pattern is to redirect the user on to the next system (e.g. back to the customer’s own site, or to a confirmation page).
2. Phone flow (RP or user)
Here the customer’s own system initiates the session — typically while the user is on an active call. This is done with a Send HTTP Request job:
POST https://bankid.bosbec.io/api/phone-auth/<my-unique-path>
Content-Type: application/json

{
  "pnr": "<pnr>",
  "callInitiator": "user"
}
Unlike the web flow, callInitiator in the phone flow depends on who called whom:
"user"— the end user called in themselves and entered their own pnr (e.g. via DTMF digits), just like in the example above."RP"(Relying Party) — the customer’s system called the end user (or otherwise initiated contact), so the user hasn’t entered anything themselves. In this case the BankID app shows the user a warning message asking them to confirm they consent to being contacted, and the user simply opens the app and approves — no manual entry needed.
Just as with the web flow, once the verification completes, a request arrives at the same pre-registered callback URL. On the customer’s account, an HTTP trigger on that path receives it — from there, it’s up to the customer how they relay the result to the user or to whoever initiated the session. A common pattern is to make a follow-up API call to the telephony system, so the agent handling the call can see that the caller has been verified.
Response when a session is started
{
  "workflowUrl": "https://<your-unique-http-endpoint>.in.bosbec.io/completed",
  "orderRef": "<order-reference-guid>",
  "autoStartToken": null,
  "qrStartToken": null,
  "qrStartSecret": null
}
Callback payload when the session completes
{
  "OrderReference": "<order-reference-guid>",
  "FirstName": "<first-name>",
  "LastName": "<last-name>",
  "PersonalNumber": "<personal-number>"
}
Summary
- Use Bosbec’s own BankID setup for the simplest integration; use a broker if you need the verification screen to show your own branding/certificate — see Integrating BankID via IDkollen for that route.
- Choose callback if you can expose a public endpoint and want the fastest result; choose polling if you want a simpler setup with no public endpoint.
callInitiatoris about the phone call, not the BankID session. It is always"user"for the web flow; for the phone flow it’s"user"if the end user called in, or"RP"if the customer’s system called them.- If you’re using Bosbec’s built-in BankID service, remember that a BankID user (and the unique path/callback URL) must be set up manually by Bosbec before the customer can start testing — this can’t be self-served.