
This article shows how to verify a person's identity with BankID through IDkollen's API from a Bosbec workflow, using a phone authentication where your organisation starts the verification during a call. It covers the whole flow: storing your IDkollen credentials, starting a session, and reading the result.
Because the verification runs through your IDkollen BankID configuration, the BankID app shows your company as the requesting party.
IDkollen's own documentation is at developers.idkollen.se.
How a verification runs
Every BankID verification follows the same three steps, whatever starts it:
- A session is started. Your workflow calls IDkollen with the personal number of the person to be verified, and gets a session id back.
- The person approves in the BankID app. This happens on their own device — there is nothing to build for this step.
- The result comes back. Bosbec or your own backend receives it, either by asking IDkollen for it or by IDkollen calling you.
Who does what
Three parties are involved, and keeping them apart makes the rest easier to follow:
- IDkollen verifies the identity with BankID and returns the verification result.
- Bosbec orchestrates the flow around it — the trigger, the calls, the delays and routes, the messages out.
- Your own systems — CRM, ERP, or whatever holds the customer record — hold the data and carry out whatever the verification was for.
Which of the first two receives the result depends on who integrates against IDkollen. In the flow below Bosbec makes the calls, so Bosbec receives it; if you integrate directly from your own backend, that is where it lands.
Phone authentication, and where it fits
IDkollen calls it a phone authentication when the verification happens during a phone call. Your organisation supplies the personal number, and the person only has to open their BankID app — the session is already waiting for them. A nurse booking an appointment, for example, needs to confirm who they are speaking to.
Two things follow from that:
- Your side supplies the personal number, so it has to be known before the workflow runs.
- BankID shows the person an extra notice, confirming that they have chosen to verify this way. That comes from BankID itself, not from IDkollen or Bosbec, and it is expected.
The alternative is a standard authentication, where the person enters their own personal number, typically on a web page. It uses a different endpoint, noted below; everything else in this article is the same.
callInitiator: who rang whom
callInitiator records who started the phone call. It does not describe who starts the BankID session, which is easy to assume and is the one parameter worth reading twice.
| Value | Use it when |
|---|---|
USER |
The person called in to your organisation |
RP |
Your organisation called the person |
So a support line that customers ring sends USER, even though your side is what starts the BankID session. The nurse in the example rings the patient, so that workflow sends RP.
Before you start
You need an IDkollen account and a Bosbec account.
Phone authentication has to be enabled on your IDkollen account. Ask IDkollen to switch it on before you start building.
From IDkollen, take two values:
| Value | Where it goes in Bosbec |
|---|---|
| Account ID | An account setting, idkollen_account_id |
| Secret key | A secret, idkollen_secret |
IDkollen has two environments. Point your requests at https://stgapi.idkollen.se while you are building, and at https://api.idkollen.se once you go live. Staging works only with a Test BankID, not with an ordinary one, so get one of those before you try the flow end to end.
Getting the example workflow
The workflow this article describes is ready to import. Open Workflow Builder and navigate to View > Workflow Library. Under Templates, search for IDkollen and you will find "IDkollen: BankId Phone Auth" — select use this template.
Importing it first is worth doing even if you intend to build your own. The sections below describe the jobs it contains, so you can follow along in the workflow rather than reading about it, and the two credentials are the only things you have to fill in before it runs.
Storing your IDkollen credentials
- In the Bosbec admin panel, go to Settings at the top right and select Account Settings.
- Under Account, add the account ID as
idkollen_account_id. - Add the secret key as a secret named
idkollen_secret.
Keeping the secret as a secret rather than a plain account setting means it is stored encrypted and never shown back to you. Both are then easy to replace without touching the workflow, which matters when a key is rotated.
Building the Basic Auth header
Every IDkollen endpoint uses Basic authentication: the username is your account ID and the password is your secret key. Basic authentication wants those Base64-encoded as a single id:secret string, so build that once at the start of the workflow and reuse it.
Use a Data operations job with a Base64 operation:
| Field | Value |
|---|---|
| Source | {{settings.customsettings.idkollen_account_id}}:{{settings.secrets.idkollen_secret}} |
| Destination | metadata.basic_auth_header |
| Data type | Text |
Writing the result to metadata keeps it available to every later job in the workflow, so the encoding happens once rather than in front of each call. See Workflow Builder expression syntax for how these expressions are written.
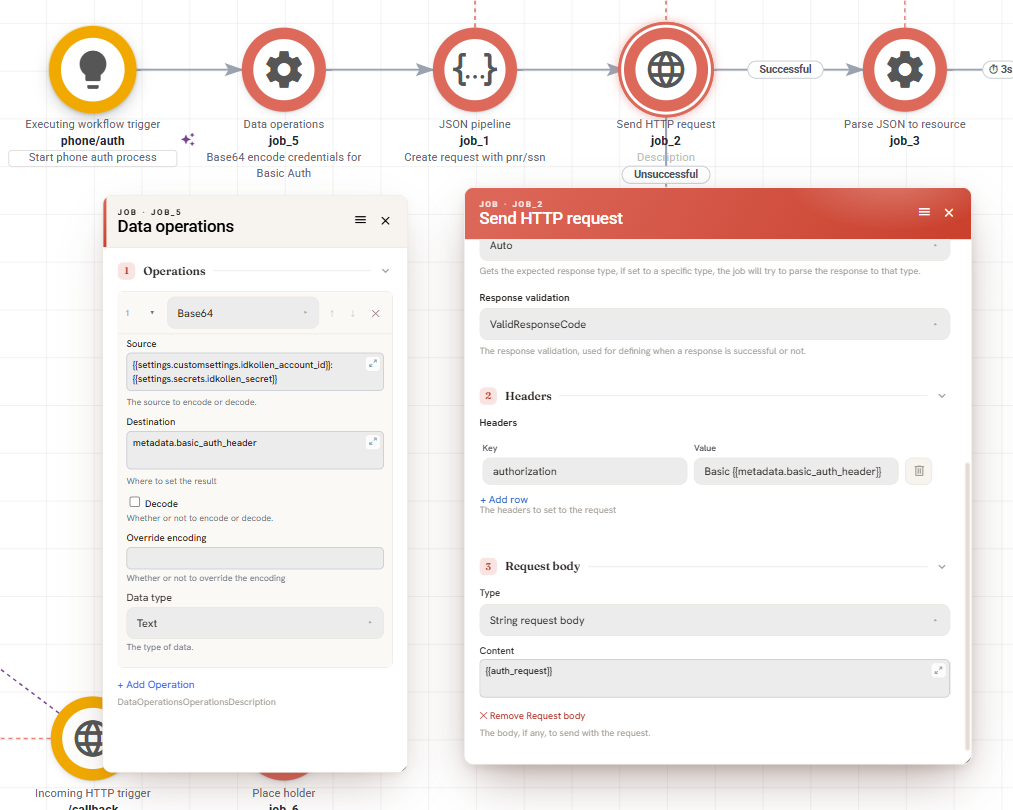
Each request then carries the header:
| Key | Value |
|---|---|
authorization |
Basic {{metadata.basic_auth_header}} |
Starting the authentication session
- Set up an HTTP channel and create an HTTP trigger on it. This is what the interface or automated process calls to start a verification. See Triggers if these are new to you, and Channels – Incoming for how the channel itself is configured.
- Use a JSON pipeline job to assemble the request body. It needs the person's personal number in
ssn, andcallInitiatorset according to who rang whom. - Use a Send HTTP request job to
POSTthat body to/v3/bankid-se/phone/auth, with the authorization header above and the request body content set to the JSON pipeline's output. See Send HTTP request for the job's other settings.
For a standard authentication, where the person enters their own personal number, post to /v3/bankid-se/auth instead and leave out callInitiator — there is no call for it to describe.
In the example workflow the personal number is hardcoded in the JSON pipeline, so you can see the shape the body takes. In a real integration it arrives with the request that fires the trigger.
A successful start returns 201 and an id. That id is the session, and it is what you use to ask about progress.
Getting the result: polling or callback
There are two ways to find out how the verification went.
| Approach | Why choose it | What it costs |
|---|---|---|
| Polling | Nothing to configure beyond what you already have | You decide how often to ask, so the result arrives slightly later |
| Callback | Fastest result, and no repeated requests | IDkollen has to whitelist your callback URL, and you should verify the signature |
The example polls, because that works on any account with no setup.
Polling
GET /v3/bankid-se/auth/{id} with the id you were given. Note the path: status is read from the standard auth endpoint, not from phone/auth.
Put a delay between attempts. IDkollen rate limits this endpoint to one request per second, and there is no benefit to asking faster anyway — a person needs a few seconds to reach for their phone. The example waits three seconds.
Also add a counter limiting how many times the workflow will ask. Without one, anything unexpected leaves a workflow polling indefinitely.
Callback
If you would rather be told than ask, point a second HTTP trigger at its own path and have IDkollen call it. The URL has to be whitelisted first: IDkollen can either register a static URL they call automatically, or whitelist your domains so you can pass a callbackUrl when you start each session. Email them to set that up.
With a callback you need a way to match an incoming result back to the session that produced it. Two options, and they are not exclusive:
- Send your own reference as
refIdwhen you start the session. It comes back untouched in the result, so it is enough on its own to tell one verification from another. - Create a unit for the session with a Unit Pipeline job, storing the session id on it, and look the unit up when the callback arrives. This does more than correlate: it gives the verification somewhere to live, so you can follow it from start to finish and keep the outcome against the person it belongs to.
Verifying a callback
Anyone who learns your callback URL can post to it, so check that a result actually came from IDkollen before you act on it.
Each callback carries an X-Signature-SHA256 header: a Base64-encoded HMAC SHA-256 of the request payload, keyed with a shared secret IDkollen gives you. Compute the same signature over the raw body as it arrived — the original string, not a copy you have parsed and re-serialised, which would not match — and accept the request only if the two are equal.
IDkollen's callback documentation has the details.
Handling the three statuses
A status response comes back as one of three values:
PENDING— the person has not finished yet. Wait, then ask again, until the counter runs out.FAILED— the verification did not complete. Route this somewhere useful, such as notifying whoever started the session, so they know to try again rather than waiting.COMPLETED— the verification succeeded, and the response carries the person's details. See below.
Treating FAILED as its own route rather than as "not yet successful" is worth the small amount of extra work. It is the difference between the nurse in the example being told something went wrong and simply watching nothing happen.
What a completed verification returns
{
  "id": "1668b9da-bff1-4dfc-ad48-60507b5a8d12",
  "refId": "12398698",
  "status": "COMPLETED",
  "ssn": "YYYYMMDDXXXX",
  "name": "Firstname Lastname",
  "givenName": "Firstname",
  "surname": "Lastname",
  "certStartDate": "2020-01-01",
  "companySignatoryText": "X är företrädare för Y..."
}
| Field | What it is |
|---|---|
id |
The session, the same id you polled with |
refId |
The refId you sent when starting the session, if any |
ssn |
The personal number of the authenticated person |
name |
Their full name, with givenName and surname as its parts |
certStartDate |
The date their BankID was issued |
companySignatoryText |
Text describing whether they are a signatory for the organisation number given at the start |
Which field matters most depends on how the session started. In a phone authentication you supplied the ssn yourself, so what you learn is the name — confirmation that the number belongs to the person you are speaking to. In a standard authentication the person entered their own number, so ssn is the part you did not already know.
certStartDate is worth knowing about even if you ignore it. A BankID issued very recently is a signal some organisations weigh in fraud checks, since taking over someone's identity usually means issuing a new one.
Use a Parse JSON to resource job to read the response — job_3 in the example workflow — and the fields are then available to everything downstream.
Bear in mind that the response contains a personal number. Avoid writing the whole payload into a log or a message where only the name is needed.
After a successful verification
Once IDkollen has confirmed the identity, Bosbec and the systems connected to it can carry on with whatever the verification was for — retrieving protected information, updating an order, changing customer details. The example workflow stops at the result, because that next part belongs to your own process rather than to the integration.
Common directions from here:
- Answer the API call that started the flow, so the calling interface can act on it. See HTTP-in status codes and responses.
- Send the outcome as a message to the person who started the session.
- Call your own CRM or ERP to release the information or make the change the verification unlocked.
- Store it against a unit, so the verification is recorded against the person it belongs to.
If a verification does not behave as you expect, Troubleshooting your workflow covers how to follow a run through the workflow log.
Related
Integrating BankID via Bosbec takes the wider view. It compares web and phone flows, goes further into who supplies the personal number and why, and covers Bosbec's own built-in BankID service — which uses Bosbec's certificate rather than yours. Read it if you want the general picture rather than the IDkollen route.
Summary
- Have IDkollen enable phone authentication on your account first, and use a Test BankID against staging.
- Store the account ID as an account setting and the secret key as a secret, then Base64-encode them into metadata once and reuse the header for every call.
- Start a phone authentication with
POST /v3/bankid-se/phone/auth, sendingssnandcallInitiator. Use/v3/bankid-se/authwhen the person enters their own number. callInitiatoris about the phone call, not the BankID session:USERif they rang you,RPif you rang them.- Read the outcome with
GET /v3/bankid-se/auth/{id}, at most once per second, with a retry limit so the workflow always ends. - A completed result gives you the person's
nameas well as thessn— in a phone authentication the name is the part you did not already have. - If you take callbacks, verify the
X-Signature-SHA256header before trusting the result. - Give
FAILEDits own route. Silence is a worse answer than an error.