When using our services for sending emails, we recommend you make some adjustments to your DNS records for the domain you wish to send the emails from; otherwise, the email messages may be rejected or delivered to spam folders at the receiver’s end.
The suggested actions are:
- Adding “include: _spf.bosbec.io” to your SPF record.
- Requesting a DKIM from our support.
- Add the DKIM as a CNAME record containing the obtained DNS record.
- Make sure you have your DMARC records configured correctly.
How to do each step and how to test the configuration is described in this article.
DNS records
When a receiving email server receives an email message, the server checks if the message was sent from a server that is permitted to send messages for that sender’s email domain. This is done by checking the SPF DNS record. If the email message isn’t sent from a verified server, it can be blocked or marked as spam, depending on the domain’s settings in the DMARC DNS record.
In addition, we can sign the emails using DKIM, which verifies that the emails haven’t been tampered with since they were sent.
SPF
The SPF record contains information about which servers can send emails from the sender domain. You should have an SPF record for your domain to ensure that emails sent originate from servers you have allowed.
SPF is registered in the DNS for the email domain from which the emails are sent. A TXT record named SPF should be created, and the most simple configuration can look something like this:
v=spf1 mx ~allThis defines that servers registered in the domain’s MX record are allowed to use the domain and that emails should be marked as suspicious if they come from other servers. By setting -all instead, the emails would be rejected.
To allow the Bosbec servers to send emails from your domain, you must include them. This can be done by using the include: statement. We have our servers defined in the record _spf.bosbec.io.
An example configuration can look something like this:
v=spf1 mx include:_spf.bosbec.io ~allThis defines that all servers defined in the domain’s MX record and all our servers are allowed, and emails from other servers will be marked as suspicious.
DKIM
DKIM adds a digital signature with a private key when the message is sent. The signature is added to the email’s header as the DKIM signature. When the message is received, the receiving server can decrypt the DKIM signature using a public key from the DKIM DNS record defined in the signature.
If the signature was successfully decrypted and verified, the message is valid and has not been tampered with. A failed DKIM validation does not reject the message but is a mechanism that helps the receiving server determine whether or not the message is spam.
To configure DKIM properly, we will generate a key on our servers for your domain. We add the public key to our DNS, and you add a CNAME DNS record pointing to the public key.
For example, say your domain is example.com.
We add:
Public key: bosbec2201.domainkey.examplecom.dkim.bosbec.ioYou add:
CNAME: bosbec2201._domainkey.example.com
to: bosbec2201.domainkey.examplecom.dkim.bosbec.io
Contact us at support@bosbec.com with the domain you want to send emails from. Make sure to add contact information for someone we can contact if any issues arise. We will generate a key and provide the values you need to add to your DNS.
DMARC
DMARC is another verification mechanism used together with SPF and DKIM. It defines a policy for how the receiving email server should handle and report messages that fail the SPF and DKIM verifications. The configuration does not have to be adjusted to work with our servers, but it is recommended to have it in place.
See the example below:
v=DMARC1; p=none; pct=100; fo=1; rua=mailto:dmarc-reports@example.comThis sets that no action (p=none) should be taken for all messages (pct=100), and if any authentication mechanism fails (fo=1), send an aggregated report to the mailbox (rua=mailto:dmarcreports@example.com).
This can be configured more aggressively, but it should be done with care so that valid emails aren’t blocked.
Testing
There are many tools for checking your configurations, for example, https://mxtoolbox.com/ or
https://www.mail-tester.com/. However, sending an email to a Gmail account often is an excellent way to check your configuration.
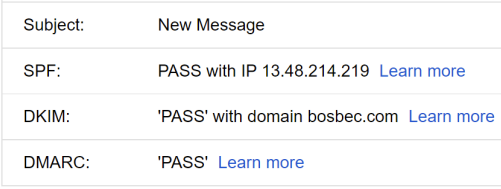
- Send the email to your Gmail address.
- Open the email, and under the “more” menu, choose “Show Original.”
- Check that SPF, DKIM, and DMARC pass, as shown in the image below.
- This view also shows the complete message so that you can take a look at the DKIM signature, Authentication-Results, or Received-SPF headers.